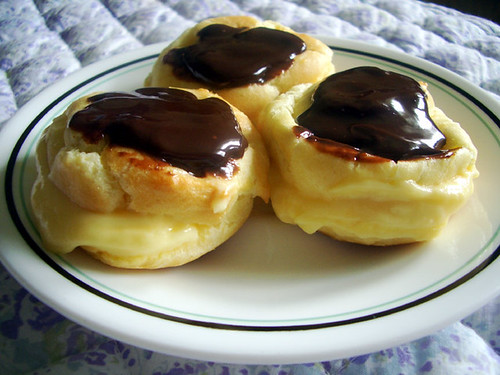
Last night, I reunited with a long lost friend--my oven. Between moving and the start of school, I didn't have much time to spare to hang out in the kitchen and bake. Lucky for me that Meeta and Tony picked Chocolate Eclairs for this month's Daring Bakers challenge, which didn't involve multiple, elaborate steps, so I was able to complete it at the very last minute.
I've made choux pastry before, so the dough quickly and easily came together. My brother wanted rounds rather than elongated fingers, so I made cream puffs instead of eclairs. I didn't have any trouble the last time I made the puff pastry, so I was very surprised when my little cream puffs all of the sudden flattened. It was amazing because they looked so golden and fluffy one minute, and then all of the air went out of them with a whoosh. I was a little saddened because I followed all of the directions as outlined by Pierre Herme and had no idea why they fell flat, but I knew that the taste would be fine and soldiered on.
I filled each puff with vanilla cream and topped them with chocolate glaze. I roughly followed the Pierre Herme recipe provided to us because I really didn't see the reason for making a separate chocolate sauce to be used in the making of the chocolate glaze. I just merged the two recipes together and made some pretty luscious topping. The chocolate glaze was definitely a nice touch, taking the cream puffs up a level.
I like a cream puff from time to time, but I get tired of them rather quickly. They are usually too rich for me, and these cream puffs were no different. They tasted great, but one will do for me. Fortunately, my brother is home for the long weekend and will eat just about anything.
Now it's back to studying for me. I hope you all enjoy Labor Day weekend (if you're in the States)!
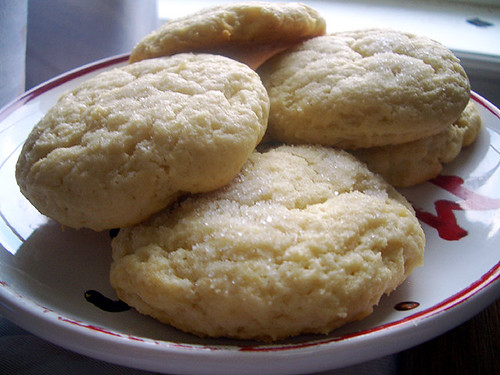
Sometimes a good novel really hits the spot. Sarah Addison Allen's The Sugar Queen did just that a couple of weeks ago. Detailing the coming of age of a young woman who chooses to eat Little Debbies rather than face the real world, this book was a perfect blend of culinary delights and magic. Both elements were involved in virtually every scene of the novel, and I immensely enjoyed this read. The book was so enchanting that it left me with a craving that only one thing could satisfy--tender and fluffy sugar cookies.
Inspired by a couple of recipes that I found via Megan, I experimented a tiny bit in the kitchen and created some truly great cookies. Using the basic sugar cookie recipe, I added cream cheese into the mix and turned out moist and delicious treats. The taste of the cream cheese supported the sweetness from the sugar well, and its texture made the cookies soft. My brother, who isn't a fan of sugar cookies at all, munched on more than a few of these while watching the Opening Ceremonies of the Beijing Olympics. He even asked me to make another batch for him. It's awesome to know that I've converted at least one person in my life to something.
If you want to try your hand at converting, please do make these cookies.
Super Soft Sugar Cookies
Ingredients (adapted from Everyday Foods)
- 2 cups all-purpose flour
- 1 teaspoon baking powder
- 1/2 teaspoon salt
- 1/4 teaspoon baking soda
- 8 tablespoons unsalted butter, softened
- 1 1/2 cups white sugar
- 1 large egg
- 1 1/2 teaspoon vanilla extract
- 4 ounces reduced-fat cream cheese
In a large bowl, cream together the butter and sugar for 2 to 4 minutes, until fluffy and light. Add the egg and vanilla, beating well after each addition. Slowly add in one-half of the flour mixture, being careful not to work the dough too much. It might be easier to switch from an electric mixer to a wooden spoon at this point. Follow with cream cheese. Finally, add in the remaining half of the flour mixture. Stir the dough just until smooth.
Drop spoonfuls of the dough onto ungreased baking sheets, spacing each mound about an inch or two apart. For aesthetics, sugar may be sprinkled on top of each cookie. Bake for 15-20 minutes, until the edges of the cookies begin to brown (the lighter, the softer). Cool on wire racks before enjoying.

As a girl constantly on the go, I almost always have a granola bar of some type in my purse. Pre-packaged in a nice little serving and possessing a tad too much sweetness, granola bars are a great pick-me-up after a couple of hours lecture or after a long, hardcore shopping fest. I love granola in all forms, so much so that I attempted to make my own granola last year with relative success. Considering that I am such a fan of granola, I started this week's Tuesdays with Dorie selection with much gusto.
And, oh, did it disappoint.
Chosen by Michelle of Bad Girl Baking, the Granola Grabbers were a quick and easy make. Throw together some butter, sugar, egg, nuts, fruits, and grains, and then pop it into the oven. For these cookies, I used my fancy, au naturel granola that I had bought from a hippie health food store way back when. Per a suggestion made by a fellow TWD member, I replaced some of the raisins with chocolate chips. I debated adding more chocolate chips to the mix, but I decided against it because some members on the discussion thread had complained about the Grabbers being too sweet.
After tasting the cookies, I wished that I had gone with my gut instinct. My Grabbers weren't overly sweet for some reason, and they could have been benefited from the extra dimension that the chocolate chips would have added. I'm not really sure what was off about these cookies. The texture was fine, the sweetness level was good, and the taste of all the ingredients shined through. I happen to love all of the dried goods that I added to the batter--coconut, raisins, peanuts, chocolate chips, and granola. Maybe the mixture of all my favorite things was too much for my taste palate. Maybe I set out to make these Granola Grabbers with too much anticipation, and you know how that goes. If you expect too much, the more you'll be disappointed.
If you want to try this recipe and figure out what it is exactly that I didn't like about these cookies, visit Michelle for more details. As usual, don't forget to check out the other TWDers to see some lovely photos of this week's selection.
I hope you all have a wonderful day!

To mark the start of the Beijing Olympics and my brother's week-long stay at home, I finally crossed something off of my to-do list and made some pizza. I have long wanted to make homemade pizza since I saw that brick-oven pizzerias in the city, such as The Wedge, used simple-looking crusts for their yummy pies. I don't have a brick oven in my house nor a baking stone, so my crust didn't have a nice, smoky tinge to it. However, the pizza still tasted great and was an awesome treat to munch on while watching the Opening Ceremonies. The crust was a wonderful "platter" for my toppings: chicken breast tenders lightly sauteed with garlic and sweet onions, grape tomatoes, baby spinach leaves, swiss cheese, and tomato sauce. The best part was that the recipe was super easy to put together and the ingredients were things commonly found in my pantry. It would be criminal if you didn't attempt this pizza at least once in our life.
Homemade Pizza Crust (via Smitten Kitchen)
Ingredients
- 1 1/2 cups all-purpose flour
- 3/4 teaspoon dry active yeast
- 1 teaspoon salt
- 1 tablespoon olive oil
- 1/2 cup lukewarm water
- cornmeal
Dump the risen dough back onto a lightly floured surface, and gently work it into a ball shape. Cover with plastic wrap, and set aside for about 20 minutes.
Sprinkle the back of a baking sheet or a pizza stone with cornmeal. Preheat the oven to about 550 degrees F. Roll out the dough to fit whichever baking apparatus is being used. Place dough onto baking sheet and cover with toppings, making sure not to go crazy with the amount of toppings. Bake for 10 minutes until the crust is slightly brown (if you like crispy).
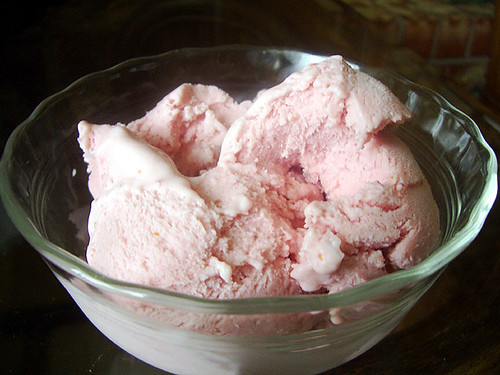
With the hot weather, I was very excited that Dolores of Chronicles of Culinary Curiosity chose Blueberry Sour Cream Ice Cream for this week's Tuesdays with Dorie selection. Though I am grateful to Dolores for her pick, I am forever indebted to David Lebovitz. Following a link publicized on The Kitchn, I found a tutorial that David put together for people not fortunate enough to own an ice cream maker. I went to Bed Bath and Beyond with the intention of procuring an ice cream maker, but I changed my mind at the last minute because I'm one for old-fashioned ways.
I didn't have any edible blueberries on hand when I set out on this frozen adventure, but I thought strawberries were a nice edition. With such few ingredients, this creamy base was a breeze to put together. Then came the long wait with breaks every 30 minutes to beat the ice cream mixture with a hand mixer. My wait was made much, much sweeter with the amazing swim from the U.S. men's 4x100-meter freestyle relay team that I witnessed on Sunday night. I love watching the Olympics, and I have never been more riveted while watching an event in my life. Jason Lezak was uh-mazing!
I can't say the same for my frozen treat. The ice cream was just all right. My brother, who is a strawberry ice cream addict, wasn't a big fan. It tasted more like strawberry yogurt. I was very pleased with the texture, though. It wasn't as creamy as store-bought ice cream, but David Lebovitz's method gets the job done. I'm definitely going to experiment more.
If you want to try your hand at this recipe, check out Dolores's blog for the full details. Don't forget to visit all the TWDers and see what they've all been up to!
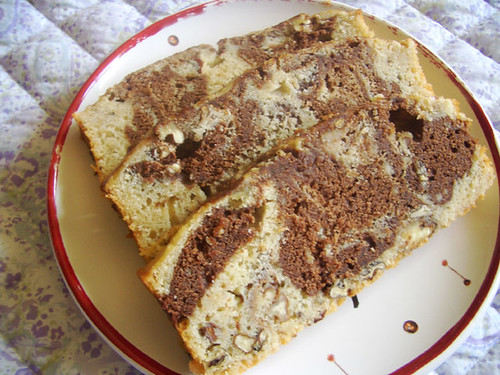
This week's Tuesday with Dorie was brought to you in part by Ashlee of A Year in the Kitchen. I have to admit that I was slightly skeptical about this recipe. I like banana breads fine, as well as chocolate ones. Together, though? I wasn't sure if the banana and chocolate flavors would mesh well in a loaf.
Fortunately, my worries were for not. The bread was moist and had a hint of a great banana taste. I went wild this week and opted to "play around" by adding the toasted pecans, which really did add a dimension to the texture and the taste. The bread wasn't overly sweet, so my parents really enjoyed this week's selection. My only complaint was that the chocolate parts could have been stronger and a bit sweeter. Perhaps I'll use semisweet chocolate instead of bittersweet if I make this again. Considering my parents' reactions to the bread, there will definitely be a next time.
Sorry that this post is on the short side. I had corrective vision surgery over the weekend, and my vision is super blurry. It was really hard to read the recipe for this week's selection, but I managed to persevere with the aide of a magnifying glass. I'll be keeping a low profile for a few days, so in the meantime, you should check out the going-ons of the other TWD members. If you want to make your very own Black and White Banana Loaf, you can find the recipe on Ashlee's blog.
I hope you all are having a wonderful week!
Anyone for a cup of tea?
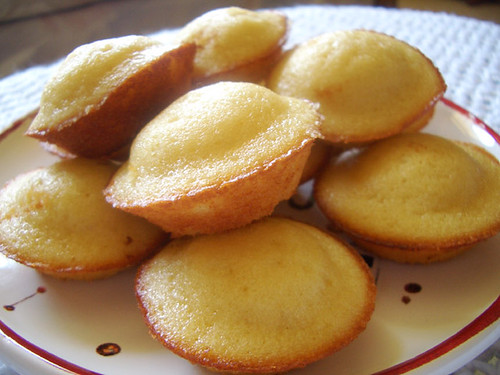
Sorry I've been missing in action for so long. It has been two weeks since I've last baked something, so I thought it was high time that I returned to the kitchen and get to work! To transition back into the baking mode, I picked this madeleine recipe from Dorie Greenspan's Baking: From My Home to Yours.
I was very excited about this recipe because madeleines were one of my favorite things to snack on while I was in France. With their subtle sweet, lemon flavor and their cake-like texture, they perfectly complimented a cup of tea. Every Sunday, a group of friends and I would visit a small tea salon in Clermont-Ferrand for some tea, scones, and madeleines. It was truly a great way to celebrate the one day of rest.
I did not have a madeleine baking mold on hand, so I had to make due with some mini-muffin tins. They weren't as elegant as the traditional shell-shape, but I thought they still looked cute coming out of the oven with their rounded tops. While the taste of the madeleines was good, it wasn't perfect. The lemon flavor wasn't strong enough because I opted to use lemon juice rather than lemon zest. Also, I probably overmixed the batter because the madeleines had a sponge-like texture rather than a cakey one. Nevertheless, these little cookie-cakes were tasty snacks.
Madeleines
Ingredients (adapted from Dorie Greenspan's Baking: From My Home to Yours)
- 1/2 cup white sugar
- 2 1/2 teaspoons lemon juice
- 2 large eggs
- 2/3 cup all-purpose flour
- Pinch of salt
- 1 teaspoon baking powder
- 6 tablespoons unsalted butter, melted and cooled
Whisk together the flour, salt, and baking powder. Gently fold into the wet ingredients, followed by the melted butter. Be careful not to overmix. Cover the batter in plastic wrap by pressing the wrap against the top of the batter. Now set the batter in the refrigerator for at least 3 hours (I left mine overnight).
When you are ready to bake, preheat the oven to 400 degrees F. Prepare the baking pans by spraying them with baking spray or by buttering and flouring them. Spoon the batter into the molds, filling each about 3/4 full. Bake mini-madeleines for 8-10 minutes while full-sized madeleines should be left in the oven for 11-12 minutes. The tops of the madeleines should spring back slightly when pressed upon.
Cool the madeleines on a wire rack for a few minutes, and then enjoy!
Subscribe to:
Posts (Atom)